Friday, September 05, 2008

Getting Funky With The Funky Hand!


This week's challenge has been very kindly sponsored by Anice, the designer behind the fabulous Funky Hand - and how excited were we to be able to download one of her wonderful collections to try out for ourselves.
Some of the Design Team have never used downloadable papers and images, so it was a real trip into the unknown for some!

We've used a lovely collection called "Shabby Saturday" for this week's dare along with a template to work with, so that even if you don't have the same papers, you can still join in using your own stash>
Funky Hand has a wide range of design collections available for a very reasonable download price. You get lots of different designs that all work together perfectly so it's easy to make beautifully co-ordinated cards and projects. As well as the papers there are images, alphabets and sentiments, all there ready for you to print and get busy creating with. If like some of us, you've never tried this sort of thing, well give it a go - it's not nearly as tricky or scary as we thought :)
....and, oh yes, there's more.....
We're having one of our wonderful Lucky Dips this week, because Anice has very generously offered a prize of a free set of "Shabby Saturday" downloads - all you need to do to have a chance of winning this fantastic prize is to join in with this dare, then come back and let us know where we can see your card. Everyone who joins in has an equal chance of winning, all the names go into the DCM "Virtual Hat" and a name is drawn at random - what more incentive do you need? hehehe

So here's your template, you can use your own papers, or why not download some from Funky Hand to have a play with.

This is what our team came up with using their yummy papers and the template. We can't wait to see how you get on with this one, and remember. this week there's a PRIZE!!!
Please leave a message with your blog link so we can come and see, we do love to see how you get on with our dares.
Have fun

SueKathy

Tuesday, September 02, 2008

Heat it Up!!

Hello and welcome to another Tuesday mid-week Little Extra. Friday’s challenge set by Jane is still ongoing and we hope you're all enjoying finding ways to use those pipe-cleaners. Keep those fabulous cards coming!

It's Vanessa here and for the Little Extra, I want to share one of my favourite techniques which is stamping into Ultra Thick Embossing Enamel (UTEE). Its been around for a while I know, but its a great way to create embellishments for your cards. Here is my example :-


As you can see I've altered three squares (using thin chipboard) to create the embellishments. You can easily use card/chipboard/mountboard for this technique, paper is not really suitable as its too thin and will probably bevel, the sturdier the base, the better.

Firstly, you will need a versamark inkpad or pigment inkpad to ink up your chipboard piece(s).

Then, sprinkle the clear ultra thick embossing powder (UTEE) over the top – shake off the excess and pour back into your jar.


Take your heat gun and place the piece(s) onto a heat resistant and non-stick surface. Heat with the heat gun, moving slowly along whilst the powder melts.

You will need to repeat these two steps approximately three or four times to give a nice thick coating. I’ve used four coats as I love the enamel splurging over the side when I stamp into the final layer.


Next, re-ink your pieces with some clear pigment ink/versamark ink and sprinkle a final layer of coloured embossing powder – I’ve used two colours, gold and green. Shake off the excess. If you're quick enough, you won't need to do the re-inking bit and just sprinkle the final layers of powder onto the hot molten enamel.

Before heating this final layer, ink up a patterned stamp that will cover the whole of your chipboard piece and put to one side. Then, melt the final layer until the powder is molten and immediately place the stamp on top of the molten enamel - don’t press, just leave it to sit on top for about 30-40 seconds and then remove. Your piece should have a lovely imprinted enamelled design.


Finally, adhere your piece(s) to your card!

I really hope you’ve enjoyed this little extra, it’s not a new technique by any means, but a really enjoyable one that can have very different results each time you do it.

We would all love to see what you make using this technique so if you do decide to have a go, please leave a link in the comment section.

Thanks for looking , Vanessa. :)

Wednesday, August 27, 2008

Piping Hot !!

Hello, Jane here. How are you all?
Hope you lot over there in the UK and Europe are having a few days of sunshine - whilst us poor souls in NZ are still in the depths of winter!

You all seem to be enjoying our 'new look' mid week dares, and we are loving all your new creations! Thank you so much to everyone who participates we really do appreciate your contributions. :)

Now, it's my turn this week to set the dare and I want you to use PIPE CLEANERS!! Any shape, colour or form - put them on a card! I know it can be difficult to incorporate Pipe Cleaners on cards (sticking them down is one obstacle!) but they can be put to lots of interesting uses too! So go on - it wouldn't be a challenge site if it was easy would it?

Here are some of the design teams' cards to hopefully inspire you - and don't forget to leave us a link to your cards so that we can come have a nosey at your fab creations!
Happy piping!
thanks again, Jane :)

Keryn
Monday, August 25, 2008

A Side Order with that....

Well I hope you all enjoyed walking "This Way" with us for the last dare! It's Rachel here with my little extra for this week.

After Mels Quick cards sometimes we need a little something to go with a card - you know just a little something, so my challenge to you all is to make a card and something to go with it - even if its just an extra special envelope.

I had a couple of ideas I wanted to share with you with some brief instructions.

A windmill - we all love them - really simple square of patterned paper with diagonal cuts then folding alternate corners over onto a stem. I rescued an ugly unloved promo one and recycled the base! The centre circle was stamped on patterned paper to hold everthing in place.
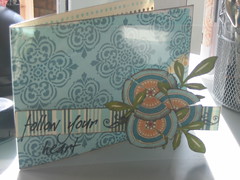
A notebook - again patterned paper and a piece of ribbon and a stamped square and handwritten title
An envelope - easy peasy with a template, if you don't have one cut open an ordinary one and use that.
A bookmark tag - just using up scraps.......
A bag-a-lope decorated with a card front.... a bag made from an A4 envelope.
Or just alter a little container for a few sweeties to lighten the day!

I don't mind what you have a go with but I thought we would venture outside our comfort zones - just a little. Can't wait to see what you all come up with!!


Thursday, August 21, 2008

This Way

Thanks to all who joined in with last week's "It's a Wrap" dare, the cards were, as always fab and full of inspirational ideas. We hope you're enjoying having a go at some of Mel's Quick Birthday Card ideas - don't forget we'd love to see how the tutorial inspires you so please share your cards by leaving a message on the Tuesday thread.

OK, this week it's Tanya's turn to set the dare and this time it's a dare with a POINT! A nice sharp point, at that!
This Way!
I want to see arrows on your cards - whether big, small, staright, curly, lots or just one arrow

Have fun and please come back and point us in the right direction for your creations just as soon as you're ready to share.

Lythan
SueRein
Kathy
Jozza

Vanessa
Tanya Leigh
Nicky

Tuesday, August 19, 2008

Little Extra - Easy Peasy Happy Birthday

We hope you're all enjoying Sue's wrap dare from Friday. There have been a beautiful array of cards created by everyone for the dare, so thankyou for joining in and don't forget that there is still time to make a card for the dare if you'd like to play :)

It's Mel here for a fun, little extra dare :) This one is Easy Peasy Happy Birthday Cards. You know the times when you've suddenly realised that you need a card and there is only enough time left to create something fast and simple (because you've left it until the last minute to start).

Well...the mid week little extra is just for you - create something fast and cute in advance so you aren't caught off guard with those last minute birthday cards ever again :))


Here are a few ideas to get you started. This first card has been created by hand cutting out a simple, large flower from patterned paper. Add a small circle of patterned paper for the flower center and sew on a button to complete the look.


Another quick idea is to print (or type/stamp) your birthday message, cut into strips and adhere on the card. Add a small embellishment under the message for a nice finishing touch.


Using transparencies for the background of your card makes a very speedy card. Add a die-cut, hand stamped message and small embellishment to complete the look. You can hide the adhesive (used for holding the transparency in place) behind your die-cut.


This card may seem a little more complicated, but only took about 10 or so minutes to put together. Beginning with a series of small squares, the edges were inked and each square was either stamped with a birthday greeting or an embellishment was added. These were then placed on top of a die-cut and some photo corners added to complete the card.
If you'd like to join in and create an Easy Peasy Happy Birthday card, please be sure to post a link to your card in the comments so that we (and everybody else) can take a peek.

Friday, August 15, 2008

Its a Wrap

Hi all, It’s Sue here and it’s my turn to come up with a dare for you this week.

I think I’ve come up with something a little fiendish but before I reveal all the team would like to thank everyone who took part in Rachel’s ‘Scrumdiddlyumptious’ dare last week. I wasn’t here to take part in this one myself but I’ve been to see what you were all up to and worked up a real appetite looking at all those foodie cards!

Ok, on with this weeks dare.
It’s a Wrap

No, not the kind stuffed with Chicken & Cesar Salad or the woolly kind you put around your shoulders to keep you warm, mind you, the way our summer is going I think we could all do with one of those!

I would like you to give your card a coat made of acetate, vellum or anything for that matter.
As long as it ‘wraps’ around the outside of your card, anything goes!

Here are a few creations from the design team to help get your creative juices flowing and don’t forget, when you’ve created your master piece, pop back and leave us a comment and your blog link because we love to see all your cards.
VanessaRachel SueRhi
Lythan
Jozza
Kathy
Rein
Nicky
Tanya Leigh